Saturday, February 27, 2010

Rod Building, Part 5


Today was a great day to roll the lathe out of the garage and shape a rod handle. Now, RPMs and the grit number of sand paper are not as important as the safety precautions you should take when operating a lathe. Safety glasses are a must, and a paper respirator is not a bad idea. Because your hands and arm are so close to moving parts you have to avoid wearing long sleeves or jewelry. Think safety.
After sanding through the hardened epoxy beads and leveling the cork rings you can begin to slowly uncover your hidden shape. When finished up with the finest grit you can call it done, or choose to use a cork sealer as I have above. Before applying the sealer you have to clean the finished shape with a wet paper towel. You do this while the rod is still turning. Touch up with a dry paper towel, turn lathe off, and wait. When the cork handle is completely dry you can lightly brush on the sealer, and when the sealer is completely dry you have to turn the lathe on again and touch up with the finest grit paper.

Many rod builders build their handles off the blank. They follow similar steps but turn the handle on a steel mandrill. When the handle is complete it is reamed and glued onto the blank. This process allows for mistakes to be made when shaping and avoids possible damage to the rod blank. Our method does not allow mistakes so we try very hard not to make them.
Sunday, February 21, 2010

Rod Building, Part 4


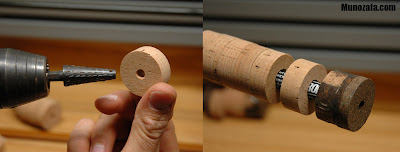
Cork is getting expensive these days, but I still buy the best quality that I can get my hands on. Here I drill both sides of the ring with what I call an angled "bur" bit. You can visualize the inside space being that of an hour glass, and the ring should be most snug in the middle allowing pace for epoxy between rings. The 10 piece cookie fixed (epoxied) on the blank is what we stack the rest of the rings against.

I apply epoxy with a popsicle stick, or tongue depressor (Whatever you want to call them). My left hand continuously rotates the blank counter clockwise so I don't have to be reaching around with the stick. I use epoxy sparingly, a dab on the blank, spread onto the face of the cork, push next ring down, and twist. You should see a small bead of epoxy around where the two rings touch. A lot of rod builders build their casting handles in one epoxy step. I recommend doing this in two steps. First the lower handle, and then the seat and upper handle. Unless you are mass producing or short on patience there is no reason to rush. Need I mention pianos again?

We use 20 or 30 minute epoxy for the handle assembly. 5 minute epoxy cures way too fast for this step, especially if you run into a problem, like not having your clamp set up before mixing the epoxy. Never clamp too tight because it is possible to break a ring. I usually leave my handles in the clamp over night, but a few hours will do if you need to turn it on the lathe the same day. That's right, the lathe is next!

Saturday, February 20, 2010

We Join Salty Shores


We just posted this little hair-bug of Chip's on Sam Root's SaltyShores.com. After trading e-mails and sharing photos with Sam he offered us a shot at being a contributor on his fast growing Florida based web site. Sam originally created SaltyShores as a way to photo-document his fishing reports. He then allowed other shutter-bug anglers to post their fishing report images and it took off from there. Our friend Captain Kenny Smith, of InshoreNearshore, is a contributor as well. I hope my amateur photography can keep up with the quality that the SaltyShores site hosts. I accept the challenge.

Thursday, February 18, 2010

Rod Building, Part 3


Ok, let's speed things up a bit. Here is the completed 10 piece cookie that is going to be our rod butt. We have bored out the poker-chip side to the diameter of the butt of the blank but only 1/2" deep. The rubberized side of the cookie still has the original hole. We need this hole in order to attach the rod to the lathe; this will be plugged when the handle is complete.
Before we epoxy the butt-cookie (that just sounds wrong) to the blank we need to find the spine of the rod. This is done by rolling the blank between your palms, under slight pressure. We are trying to detect at what part of the axis the rod resist bending. This is the spine, and this is where I position the reel seat and guides for a casting rod.
Ok, so maybe this post should have been part 2.5.

Wednesday, February 10, 2010

Rod Building, Part 2


I know I said that I'd keep it simple, but what do you expect? We're making pianos here! Well, not really pianos but a true custom fishing rod. The piano thing is what you say to someone that is taking too much time or getting too detailed on something very simple. As an artist, fly tyer, rod builder, and all around perfectionist doing power plant demolition, I was once told "We're not making pianos here Mike!" That was a long time ago, and like I said, I'm make'n em now.
I dislike pre-formed cork handles, and every rod on the rack has them, even the high dollar rods. However, I wouldn't get on any rod builder's case for using them. I keep a few around for repairs and real inexpensive jobs. Cork rings are what I learned how to build rod handles with and these extra steps make a rod even more unique. Cork rings and composite rings are available anywhere you buy rod building components. Looking at my catalog I count at least ten different types of material rings come in. Just don't be that guy that thinks he needs all ten types in the same rod handle!
The parts above are some examples of what I call cookies. I know, I'm talking pianos and now cookies. When individual cork rings are epoxied with others of different material rings and then trimmed down close the original size of one ring (11/34" O.D. , 1/2"thick), I call it a cookie. The two cookies on the right are two-piece cookies, half rubberized and half burnt burl. The cookie in the middle is a poker chip cookie (Very difficult and time consuming to make without a special jig; I don't have that special jig).
When epoxying the cork rings and cookies to the rod you put a dab of epoxy on the rod blank and then slide the ring in place. Repeat a dozen times, and then clamp tight. We'll see this step later on. My point now is to explain why I make the flat cookies like the two on the right? Why not just treat the two thin rings as a full cork ring in the handle epoxying step, dab and slide? Because these little guys are fragile. Four-piece cookies more so (see blog post: Indoors), and 19 pieces cookies like the one here, even more. If you don't make the cookie first you could have the little pieces pressed unevenly and turn out wobbled. Imagine that the thin cork rings are pancakes and the epoxy is syrup. Now stack twenty pancakes and push down. Get the picture? Again, making the cookies first prevents even the slightest wobble between thin rings, assuming your cookies are made correctly. Does it really mater? If you're making pianos it does!

Tuesday, February 9, 2010

Chip Evans Flies


I am a pretty good fly tyer, and I can do about any fly. However, I now only do flies that I am good at and that I enjoy doing. That leaves out the real small stuff and the deer hair. Thank goodness I have enough small flies, and I have Chip Evans. "Chipper" is what most folks call him, but his daddy named him Roy. I've known Chip for about ten years and I've fished with him quite a bit. His spun deer hair (SDH) flies are a joy just to hold in your hand and look at. I hate to get the new ones wet, much less crushed by a redfish or bass. These here in the photo don't show the true stacking ability that chip has with multi-color deer hair flies. These are ones that I've special requested over time. These two on the top left are new SDH poppers that I cannot wait to fish. The bottom left are SDH divers, Dahlberg's, that work well in fresh or saltwater. The top right flies are Chip's "Super Fly". These are a little larger than his river size but I requested these for trout and redfish. Finally, these beauties on the bottom right are his fat-head minnows and EP Minnows. Pacific Fly Group of California reproduces the fat-head minnow and distributes them to fly shops all over the US. Some of Chip's original patterns are available at Gruene Outfitters and Sportsman's Finest. Other popular patterns of Chip's are the peeper frog, the swimming lizard, and the river craw. Chip's peeper frog and river craw can be seen in the fly gallery on our home site.
If you want to throw immaculate looking, well performing, and long lasting custom flies, contact Chipper while he's got some winter down time left. I've got my order placed.

Wednesday, February 3, 2010

Rod Building, Part 1


This time around I'll keep it simple.
I just ordered components from my usual source, the Anger's Workshop catalog. Aside from figuring out what function the rod should serve, we've got to create it on paper or in our mind. Rod design is tricky without being able to hand-pick components from bins and sure-fit parts together. Beginner rod builders typically depend on kits or some form of impersonal instruction like a book or video. If you can get into a workshop or have someone with experience walk you through your first rod you're ahead of the curve. With over ten years of rod building experience I still appreciate it when the folks at Angler's Workshop lend their expertise. Before ordering it is important to be familiar with things like guide sizes, tip top barrel sizes, and how to use calipers or a micrometer to check other measurements. A lot of this will become second nature as your rod building experience grows. We can see now that the rod designing, or plan, is the first step, and as my first teacher of this craft always said, "You gota have plan!"
For this project we are using a St. Croix rod blank, model 5S66MLF2-G. This means it is a 'graphite 5' blank, spinning model, 6 foot-6 inch, medium-lite fast-action, 2 piece, green finish. We're using REC recoils made of nickel titanium; these are flexible and corrosion resistant. Our cork is premium flor grade, plus we'll be using some burnt burl as well as rubber composite. The reel seat is a Fuji graphite, exposed blank trigger seat. The rest of the parts include a Struble nickel silver winding check, a small chrome hook keep, a Fuji titanium SiC tip top, and a Fuji rubber butt cap. Most of these components will have to be modified first before being assembled to the rod.