Saturday, October 16, 2010

The End


This is my last post, the end of the Blogspot "Munozafa" blog.
First, a thanks to all who have viewed and enjoyed. I've had a lot of fun photographing and writing about the rods, the flies, the fishing, and the other things. Best of all I've got to share it all with you, my friends and family. As time constraints become greater and priorities change, I find myself renewing my sense of adventure and expression. I hope I've inspired some of you to start blogging or continue blogging. I'd like to thank my friends Kenny Smith (Inshore Nearshore) and Sam Root (Saltyshores) for inspiring me.

Until the next time,

Chao!

Sunday, August 29, 2010

Medina River Matinée


I have been fishing this small body of water for over ten years now, and it still throws me an occasional curve. My greater opponent this time was the faulty memory card in my Nikon D70. I took a hand full of photos on this trip that I was really excited to see again, but that didn't happen. Twenty-two of them were unaccessible on the card and I was not about to pay another $20 at Precision Camera to retrieve them. That was more out of principle and stubbornness than anything else. On the other hand, fishing was good. Harrison and I caught a lot of bass, some huge bluegill, and a few carp. I'm still too disappointed to give much more of a description than that. Until next time.

Monday, August 16, 2010

Port Mansfield


I have never outright forgot my camera case until this trip, but a big thanks to Lonnie for being prepared with his waterproof point and shoot camera. Bernie, Lonnie and I launched kayaks off the south jetty at Port Mansfield this past Sunday, and did battle with 5 species of fish (tarpon, trout, redfish, snook, and ladyfish). I had my 10 weight fly rod rigged and ready, but without any indication of my target species I opted to throw buck tail and soft plastic jigs. Being somewhat of a purist in fly fishing, I thought all soft plastics were created equal, and I felt that I'd never need the additional help of scented products when sight casting these bombs to fish. Berkley Gulp has changed my mind.
Bernie threw a Gulp shrimp and concentrated on a smaller area than Lonnie I, and that proved to be most productive. Lonnie threw in more open water and got a lot more ladyfish activity than Bernie and me. I was all over the place, looking for signs of the silver king. To my credit, I did jump one small tarpon (small meaning about 20 lbs.).

Sunday, August 8, 2010

Port Aransas, Once More


I wasn't planning on another flats fishing adventure in Port Aransas, but my good friend Chip Evans and his dad talked me into joining them this Saturday. Like many times before, I arrived at first light. The ferry ride from Aransas Pass to Port Aransas always gives me a good feeling inside. What makes that feeling even better are the barbacoa breakfast tacos at CMR.

Chip, as some of you may remember, ties the nicest deer hair flies around, and he ties about every other kind of fly with as much attention to detail. On this particular outing we were not using deer hair bugs and Chip wasn't even using a fly rod. He had just purchase the G. Loomis Escape series spinning rod (line weight 2-6 lbs) like the one I have been bragging about since last fall. What made his rod special was the vintage reel that he put on it, a Penn 716 Spinfisher (c. 1965).

It was a beautiful morning and I had been telling myself that I was going to take photos rather than pursue fish all day. That was easier said than done. With rod in hand and my camera nearby, short windows of opportunity for both weapons were abound. I was not disciplined enough to just hold the camera, and not coordinated enough to hold both. I got some good shots with each and I misses some other good shots with each. Should I invest in a helmet cam to solve this dilema?

Chip and his dad arrived about an hour after I did. By 7:00 a.m. I had already seen a lot of fish in shallow water and I had landed a few, but the rising sun was about to give us the edge we needed. When the clock struck 10:00 a.m. the lights came on and we saw fish every in direction. Good tides might have had something to do with it as well. The redfish averaged 22 inches and the black drum and ladyfish were of good size. All were great on light tackle; I comfortably threw my 6 wt GLX all day long. The wind was mild in the morning but picked up to 12 mph towards the late afternoon. It was a great day to be alive, and a nice break from life back on the ranch.

Sunday, July 25, 2010

A Closer Look


From top to bottom as follows: A lone ladybug, a hibiscus flower with typical red stigma & yellow stamen, a Carolina Sphinx Moth caterpiller infested with parasitic wasp larve, and an empty cicada nymph shell.

Monday, July 12, 2010

High Water at Wilson's


When the usual spots get flooded with a post-tropical depression surge, it doesn't always go way as fast as it came in. Such an event made fishing a little challenging this past weekend, but we managed to pull in both red and black drum on the fly.
A lot of my friends know that I fish Wilson's Cut in Port Aransas a lot. I also like the Lighthouse Lake Trails, Brown & Root, South Bay, and lots of the back side of St. Joe. I know that these are the most popular flats in Port Aransas, but until they run out of fish, I may not look much further. I do make it a point to explore new areas when I have the chance, and I mix things up with an occasional Jetty or near-off-shore trip. My point is this; even these common areas provide class V fly fishing experiences once in a while. Try them on a weekday or explore these areas a little deeper. Just don't buy into it if someone tells you that there are not a lot of fish to be found in the Port Aransas area, because it just aint true. To improve your odds, be aware of what the tides are doing and where the water levels are. Now, get out there!

Friday, June 25, 2010

Super Fluke Rig


Last year my friends at Saltyshores turned me on to these Owner Twistlock hooks. As far as I know, Owner offers sizes 1/0 and 2/0 unweighted, and sizes 3/0 and up in weighted or unweighted. This is why I use the pinch on sinkers. The Zoom brand Super Fluke Jr. is size that I prefer for throwing with my G. Loomis Escape spinning rod, and this is the set up I've been using for redfish, bass, snook, trout, and more. Don't be fooled by the weight. It's only 1/32 oz. I still pinch one on for sight casting in shallow water, and it's what gives the bait good action.

Rigging is easy. I twist the cork-screw wire into the nose of the soft plastic all the way, and just to the point where the hook can swing in line with the bait. Then I position the hook to the side of the bait in order to visualize the point of entry through the body. Push the point of the hook through the split belly of the bait. The point of the hook is now just above the dorsal side. About 1/8'' should be buried back into the dorsal side to become weedless; not deep, but very shallow. This is not a Texas rig and the point should not be burried deep in the bait! Your rig also should not deform the bait. Now add the pinch on sinker using needle nose pliers but don't over pinch it. I sometimes just add them on with my fingers. The weedless bait should look like the one above.
I recommend light spinning tackle, as you would use for bass. I also recommend about 15" of mono leader tied on between the bait and main line (whether you use braid or monofilament on the reel). I use power pro braid, so to avoid breaking my leader or rod, I set my drag so that I hear it give a little at the hook set and on a hard run. Bass assassins and other soft plastic designs work well, just as long as they have that split belly feature. Good luck!

Saturday, June 12, 2010

Mustang Island Sight Fishing


Mac Mather and I took a short trip to Mustang Island a few days ago. The plan was to cruise around in the zodiac and look for jacks, king mackerel, or maybe tarpon. However, the wind was-a-blowin'. We abandoned that idea and agreed to check out one of my usual redfish haunts. Nothing on the grass flats or sand, but we found fish in the mangroves. In four hours, and in about a foot or less of water, we caught sixteen redfish and a two black drum. Then we began to loose the preferred angle of sunlight for sight casting. We headed toward the Packery Chanel jetties for any justification to launch the zodiac. There was none. I settled for casting a sinking line on the eight weight, and managed to play a few ladyfish. The only photos we ended up taking where of a different kind of lady altogether. Well, would you have rather seen another redfish portrait? Besides, this was Mustang Island.
The next morning Mac and I got off to a slow start. It might have been the good food and cocktails at the Seafood & Spaghetti Works restaurant in Port Aransas, or just that we're getting old. I'm sure that it was restaurant. Again, we agreed to fish the same shallow water as the day before. This time of year the preferred angle of sunlight begins around 9 or 10 in the morning. So, first we enjoyed a good Mexican food breakfast and then headed out. The tide was a little higher than the evening before and the fish were not in their assigned seats. It was a slower start but we won a few tug-of-wars before we had to get on the road. The last battle, and on the sand part of the flat, was with a large ladyfish. If you're ever fly fishing for redfish and you see one of these, cast at it! kind of funny that we never launched the zodiac after draging it 175 miles down there. The only disapointment of the trip was that I slacked on the fishing photography, but it was still a great trip. No fish (or bikini ladies on horseback) kept, just admired and released.

Monday, May 31, 2010

The Blanco with Bishop


I thought, If I'm ever going to have the perfect fishing partner, I better start training him now. Bishop is my ten month old Irish Setter. He's full of vigor, to put it mildly, but all the hours of training are starting to pay off. Today I took Bishop to the Blanco River for some exercise and some fishing. The last time I attempted fishing with him was a small disaster. I had a feeling that this time would be different, and it was. As for the day's fishing program, I knew that I was going to be concentrating my efforts on a certain large pool of the river, so I brought 4 different rods to fish with (G. Loomis Escape series ultra light spin, St. Croix Avid-Micro light spin, TFO Finesse Series 1 wt., and G. Loomis GLX 6 wt.). To make a long story shorter, all rods got a little action. I threw a white deer hair diver and some small foam bugs on the fly rods, and some small jigs and bass assassins on the spinning rods.

I had a good day on the water, but Bishop might argue that he had a better one. He ran, jumped, and swam for the first four hours straight. He chewed on sticks and an old deer jaw bone that he dug up. He even found some goose droppings and a turkey vulture carcass to roll on. That stuff got washed off after a while. He was most intrigued by the fish. There was not a fish brought to shore that Bishop didn't greet first. You can see his big paw in the photo above. He wanted to be in the water in front of me at all times, which made things a little challenging. For instance, he got tangled in my fly line a few times, I hooked him once, he spooked some good fish, and he knocked off a huge bluegill that I wanted a photo of first. Well, you can't have everything, and yet another reason to use barbless hooks!
Thanks partner. We'll get out again soon.

Thursday, May 20, 2010

Floating the Llano


There is a small group of friends that have hung around and listened to me babel about nothing important on more than one occasion. I don't get to go fishing with these friends enough, but when I do, It makes me appreciate them even more. A few days ago I floated the Llano River with my old friend Richard Hearn. Rich and I have known each other for about fifteen years. We worked together in the restaurant business, and together as guides in Alaska. Our inside jokes have inside jokes.
This particular day we both had a weekday off, so we made the commitment to get out on a Texas river. Yeah, were those guys hauling down the freeway, passing morning commuters, with a canoe on top of the SUV. We headed up through Fredericksburg, then near Mason to float the Llano. Rich had just read an article about the river and realized he had never had the opportunity to float it. Being a native Texan from Bandera, he had to remedy that before word got out. We floated from Simonsville Road to highway 87. That float is slightly less than four miles but there is a lot of shoreline and rock structures to fish. The rock gardens make this float impassable for rafts. Canoes are best for this section, and even then, there are some obstacles to consider.
Fishing was exceptional this time out. We caught mostly largemouth, and some sunfish. I couldn't get any top water action, but crayfish flies were very reliable when I let them get deep. I got the most gratification from a bass that I didn't land. I casted at the bank where the vegetation made a vertical wall. My lead-eye bunny leach hit the water hard and just before it sunk out of sight, the wall of vegetation opened up and a hefty bass inhaled my fly. Now, I was standing in the canoe, and I had just stripped the slack out of the line when I saw this happen. I immediately made an effort to set the hook with the rod and not with another strip of the line, a common mistake. The fly slipped out of the fish's mouth, and out of the water. The fish darted in the direction that the fly went, but was long gone by the time I swung the fly back in the water. It was an unfortunate mistake, but exciting to see.

Thursday, May 6, 2010

Operation Low Tide


Last week Port Aransas was blessed with several days of prime sight casting conditions. The day that we went, there was not a cloud in the sky and the wind was a mild breeze. The tides were low, so, we had to adjust the game plan. Harrison Nash and I noticed that the tide was coming in strong by late morning, but the usual flats never came up enough. We headed north towards middle pass and found a shoreline that had a good number of fish on it. Most of the redfish were small, but there were plenty of them.

This was the second time I had used my zodiac inflatable boat for flats fishing. Some of the places I like to go are just too far to paddle the kayaks. I just anchored the boat, got out, and waded. Later that afternoon I did something I thought I'd never do. I ran this boat on the flats. I was amazed how shallow this little boat would run when on plane. I just didn't want to run out of water or run into something that might damage the pontoons. It was flawless.

Toward the end of the day the redfish seemed a little more spread out, so we drifted a few areas with potholes. This, again, was a first for the zodiac. I left the outboard down in order to prevent getting too shallow. Harrison and I finished the day off by sight casting with soft plastics to redfish. We even picked up one small black drum. If I had to do anything different I think I would have packed less gear on the boat. Less is definitely more, and lighter too!

Thursday, April 22, 2010

Jaws at Lockhart


This shot reminds me of when I was a kid; I thought the gill rakers looked like a bear trap ready to spring. Hey, is that a hair bug in there? Watch out little guy! (By the way, did everyone know that if you click the image, you open the full size file?).
I was sure to thank HG Lehman for inviting me out to the lake this week. I needed to wet a line badly. It's an addiction I'm told. I hooked HG up with a "fire sale" on bait casting rods a few months ago, and even though I got some dear sausage out of that visit, I was hopping he would call me sometime with an invite to the lake. It was overcast and windy this particular day, but I was able to do the job with my custom 6wt GLX. The only deer hair flies I seem to be throwing these days are from my buddy Chip, naturally. I went with a popper, over the vast diver selection I've acquired lately. I know I keep saying this, but I can't wait to throw these new bugs at redfish. I will try to make a saltwater trip happen soon. It has been way too long. The weather is looking "ify" for next week.

Sunday, April 11, 2010

FFF Gulf Coast Expo


Clint Jackson gave fly tying instruction in a different light, on the stage of the New Braunfels Civic Center. This weekend was the Federation of Fly Fishers (FFF) Gulf Coast Expo. There were dozens of programs and workshops, which included presentations by featured guest Chico Fernandez. It was like a family reunion. We saw friends from the Texas fly fishing community that we had not seen in a while. We made some new friends as well.

Our friend Rus Schwausch was at the expo. He had nearly as many new guide prospects as client prospects. His remote tent camp on the Alaska Peninsula is one of the most attractive destinations for guides, anglers, and adventurists. We speak from experience; the location there in Nakalilok Bay is EPIC in every way.

Sunday, April 4, 2010

Rod Building, Part 8


I love the way a newly epoxy rod looks. Unfortunately, they loose their luster like a pair of running shoes. Solution: Own more running shoes (rods) and they'll all look good longer!
The inscriptions turned out well on this rod. I have not sought the approval to share this customer's name; therefore we won't be showing that part of the inscription.
The thread looks almost black in this image, even though it is the same as olive green color as the St. Croix rod blank. It will look good in the morning sun!

In the very first rod building post, we showed a black rubber Fuji butt cap like this. We ended up not using it for this rod, but we're using it for another similar rod. This image shows the few steps to acquire this cap. First, we put it on the lathe. The inside diameter on the smallest Fuji rubber butt cap is .75". While the large cap is turning, cut the end off with a razor, and we have our new cap. The way I was taught this method, the texture was sanded off the rubber butt cap when the cork was shapped. This causes a lot of heat on the rubber, breaks down the adhesive bond, and often causes the cap to fall off during sanding or during fishing. Solution: Sand and shape the cap on the lathe before cutting with the razor (cap on the far right). To center it on the rod butt, use 1/4" masking take to build a shim. The rest is easy.

We dig the St. Croix Rods because they are what G. Loomis was 15 years ago. 1) They are the highest rated manufacturer of spinning, casting, and fly rod blanks, 2) they're customer service and warranty programs are competitive, 3) and their top of the line graphite blanks are fairly priced. I'm most impressed with their light weight and overall performance.
G. Loomis blanks are harder to get today, but there are still a good number of them floating around. Just don't expect to get any from the G. Loomis company. Let me clarify that, because you can get great rod blanks from "Gary" Loomis. North Fork Composites is Gary's new venture and he has an interesting marketing plan for rod builders and rod customers. Visit his web site for details.

Tuesday, March 30, 2010

Rod Building, Part 7


Eight guides, one hook keep, one furrel, one tip top, and a few for good measure; 20 total wraps. Until the first coat of epoxy all thread wraps are fragile, and the true identity of the rod is disguised. It is a great sense of accomplishment when you can seal all of that detailed and delicate work beneath a clear coat of epoxy. Between the thread wrapping and the epoxy brushing, It's easy to misplace the thoughts of the handle assembly. These very last steps require a steady hand, skill, and focus.
Above, the Gudebrod brand thread, size A, nylon 1892 (color), changes to a rich dark color olive when wet with epoxy. Unlike nylon thread, NCP thread does not get darker when wet. This makes you wish you were wearing NCP thread pants that day you accidentally splashed water on your crotch in the men's room; or does that just happen to me? Metallic thread color also stays, more or less, unchanged by epoxy.
Nylon thread unquestionably looks better because of the color texture. NCP thread can look pasty when used for full guide wraps. So, how do you get the rich color without darkening? Color preserve. This liquid material can be lightly brushed on the thread, and when dry the nylon thread returns back to it's dry color. The epoxy brushed on next not cannot penetrate the color preserve treated thread to darken it. Some rod builders question the guide binding strength of this method.

Wednesday, March 17, 2010

Rod Building, Part 6


Burnishing, grinding, shaping, filing, or sharpening; whatever you call it, this needs to be done to guide feet in order for thread wraps to ride up the foot of the guide without problems. I use a rounding motion to shape the sides and top, of the end, of each guide foot. I find that a small belt sander or dremel tool gives me an even roundness without flat spots. By the way, the sparks aren't normal. This happens on the nickel titanium REC recoil guides when you push hard, but I don't recommend trying to make sparks.

We've used three methods of many to get the guide spacing. Guide spacing are the distance between each guide on the rod, and is usually measured from the tip to the butt (For example; 4 1/4'', 9", 14 1/2", and so on). The three methods I used were manufacturer recommended spacing, comparison to other successful spacing, and flex tests. The reason I didn't just use the manufacturer spacings is that I added an extra guide in the line-up. This 6' 6" casting rod will have a total of eight (8) small and extremely light-weight guides. Unlike spinning and fly rods, casting rods are challenged with keeping the line from touching the blank between guides when the rod is bent downward. This is because the guides sit on top of the rod. An additional guide in the formula can reduce or eliminate this contact between the line and the rod. The inverse of this remedy is a casting rod where the maker or manufacturer skimped on the guides and there are just too few; lots of contact going on in this case.
The skill of thread wrapping is best learned from a live demonstration. Videos and books are ok, but a good teacher can propel you into doing basic wraps faster and cleaner. The same goes for more intricate wraps. More later!

Saturday, February 27, 2010

Rod Building, Part 5


Today was a great day to roll the lathe out of the garage and shape a rod handle. Now, RPMs and the grit number of sand paper are not as important as the safety precautions you should take when operating a lathe. Safety glasses are a must, and a paper respirator is not a bad idea. Because your hands and arm are so close to moving parts you have to avoid wearing long sleeves or jewelry. Think safety.
After sanding through the hardened epoxy beads and leveling the cork rings you can begin to slowly uncover your hidden shape. When finished up with the finest grit you can call it done, or choose to use a cork sealer as I have above. Before applying the sealer you have to clean the finished shape with a wet paper towel. You do this while the rod is still turning. Touch up with a dry paper towel, turn lathe off, and wait. When the cork handle is completely dry you can lightly brush on the sealer, and when the sealer is completely dry you have to turn the lathe on again and touch up with the finest grit paper.

Many rod builders build their handles off the blank. They follow similar steps but turn the handle on a steel mandrill. When the handle is complete it is reamed and glued onto the blank. This process allows for mistakes to be made when shaping and avoids possible damage to the rod blank. Our method does not allow mistakes so we try very hard not to make them.

Sunday, February 21, 2010

Rod Building, Part 4


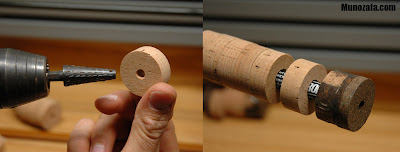
Cork is getting expensive these days, but I still buy the best quality that I can get my hands on. Here I drill both sides of the ring with what I call an angled "bur" bit. You can visualize the inside space being that of an hour glass, and the ring should be most snug in the middle allowing pace for epoxy between rings. The 10 piece cookie fixed (epoxied) on the blank is what we stack the rest of the rings against.

I apply epoxy with a popsicle stick, or tongue depressor (Whatever you want to call them). My left hand continuously rotates the blank counter clockwise so I don't have to be reaching around with the stick. I use epoxy sparingly, a dab on the blank, spread onto the face of the cork, push next ring down, and twist. You should see a small bead of epoxy around where the two rings touch. A lot of rod builders build their casting handles in one epoxy step. I recommend doing this in two steps. First the lower handle, and then the seat and upper handle. Unless you are mass producing or short on patience there is no reason to rush. Need I mention pianos again?

We use 20 or 30 minute epoxy for the handle assembly. 5 minute epoxy cures way too fast for this step, especially if you run into a problem, like not having your clamp set up before mixing the epoxy. Never clamp too tight because it is possible to break a ring. I usually leave my handles in the clamp over night, but a few hours will do if you need to turn it on the lathe the same day. That's right, the lathe is next!

Saturday, February 20, 2010

We Join Salty Shores


We just posted this little hair-bug of Chip's on Sam Root's SaltyShores.com. After trading e-mails and sharing photos with Sam he offered us a shot at being a contributor on his fast growing Florida based web site. Sam originally created SaltyShores as a way to photo-document his fishing reports. He then allowed other shutter-bug anglers to post their fishing report images and it took off from there. Our friend Captain Kenny Smith, of InshoreNearshore, is a contributor as well. I hope my amateur photography can keep up with the quality that the SaltyShores site hosts. I accept the challenge.

Thursday, February 18, 2010

Rod Building, Part 3


Ok, let's speed things up a bit. Here is the completed 10 piece cookie that is going to be our rod butt. We have bored out the poker-chip side to the diameter of the butt of the blank but only 1/2" deep. The rubberized side of the cookie still has the original hole. We need this hole in order to attach the rod to the lathe; this will be plugged when the handle is complete.
Before we epoxy the butt-cookie (that just sounds wrong) to the blank we need to find the spine of the rod. This is done by rolling the blank between your palms, under slight pressure. We are trying to detect at what part of the axis the rod resist bending. This is the spine, and this is where I position the reel seat and guides for a casting rod.
Ok, so maybe this post should have been part 2.5.

Wednesday, February 10, 2010

Rod Building, Part 2


I know I said that I'd keep it simple, but what do you expect? We're making pianos here! Well, not really pianos but a true custom fishing rod. The piano thing is what you say to someone that is taking too much time or getting too detailed on something very simple. As an artist, fly tyer, rod builder, and all around perfectionist doing power plant demolition, I was once told "We're not making pianos here Mike!" That was a long time ago, and like I said, I'm make'n em now.
I dislike pre-formed cork handles, and every rod on the rack has them, even the high dollar rods. However, I wouldn't get on any rod builder's case for using them. I keep a few around for repairs and real inexpensive jobs. Cork rings are what I learned how to build rod handles with and these extra steps make a rod even more unique. Cork rings and composite rings are available anywhere you buy rod building components. Looking at my catalog I count at least ten different types of material rings come in. Just don't be that guy that thinks he needs all ten types in the same rod handle!
The parts above are some examples of what I call cookies. I know, I'm talking pianos and now cookies. When individual cork rings are epoxied with others of different material rings and then trimmed down close the original size of one ring (11/34" O.D. , 1/2"thick), I call it a cookie. The two cookies on the right are two-piece cookies, half rubberized and half burnt burl. The cookie in the middle is a poker chip cookie (Very difficult and time consuming to make without a special jig; I don't have that special jig).
When epoxying the cork rings and cookies to the rod you put a dab of epoxy on the rod blank and then slide the ring in place. Repeat a dozen times, and then clamp tight. We'll see this step later on. My point now is to explain why I make the flat cookies like the two on the right? Why not just treat the two thin rings as a full cork ring in the handle epoxying step, dab and slide? Because these little guys are fragile. Four-piece cookies more so (see blog post: Indoors), and 19 pieces cookies like the one here, even more. If you don't make the cookie first you could have the little pieces pressed unevenly and turn out wobbled. Imagine that the thin cork rings are pancakes and the epoxy is syrup. Now stack twenty pancakes and push down. Get the picture? Again, making the cookies first prevents even the slightest wobble between thin rings, assuming your cookies are made correctly. Does it really mater? If you're making pianos it does!

Tuesday, February 9, 2010

Chip Evans Flies


I am a pretty good fly tyer, and I can do about any fly. However, I now only do flies that I am good at and that I enjoy doing. That leaves out the real small stuff and the deer hair. Thank goodness I have enough small flies, and I have Chip Evans. "Chipper" is what most folks call him, but his daddy named him Roy. I've known Chip for about ten years and I've fished with him quite a bit. His spun deer hair (SDH) flies are a joy just to hold in your hand and look at. I hate to get the new ones wet, much less crushed by a redfish or bass. These here in the photo don't show the true stacking ability that chip has with multi-color deer hair flies. These are ones that I've special requested over time. These two on the top left are new SDH poppers that I cannot wait to fish. The bottom left are SDH divers, Dahlberg's, that work well in fresh or saltwater. The top right flies are Chip's "Super Fly". These are a little larger than his river size but I requested these for trout and redfish. Finally, these beauties on the bottom right are his fat-head minnows and EP Minnows. Pacific Fly Group of California reproduces the fat-head minnow and distributes them to fly shops all over the US. Some of Chip's original patterns are available at Gruene Outfitters and Sportsman's Finest. Other popular patterns of Chip's are the peeper frog, the swimming lizard, and the river craw. Chip's peeper frog and river craw can be seen in the fly gallery on our home site.
If you want to throw immaculate looking, well performing, and long lasting custom flies, contact Chipper while he's got some winter down time left. I've got my order placed.

Wednesday, February 3, 2010

Rod Building, Part 1


This time around I'll keep it simple.
I just ordered components from my usual source, the Anger's Workshop catalog. Aside from figuring out what function the rod should serve, we've got to create it on paper or in our mind. Rod design is tricky without being able to hand-pick components from bins and sure-fit parts together. Beginner rod builders typically depend on kits or some form of impersonal instruction like a book or video. If you can get into a workshop or have someone with experience walk you through your first rod you're ahead of the curve. With over ten years of rod building experience I still appreciate it when the folks at Angler's Workshop lend their expertise. Before ordering it is important to be familiar with things like guide sizes, tip top barrel sizes, and how to use calipers or a micrometer to check other measurements. A lot of this will become second nature as your rod building experience grows. We can see now that the rod designing, or plan, is the first step, and as my first teacher of this craft always said, "You gota have plan!"
For this project we are using a St. Croix rod blank, model 5S66MLF2-G. This means it is a 'graphite 5' blank, spinning model, 6 foot-6 inch, medium-lite fast-action, 2 piece, green finish. We're using REC recoils made of nickel titanium; these are flexible and corrosion resistant. Our cork is premium flor grade, plus we'll be using some burnt burl as well as rubber composite. The reel seat is a Fuji graphite, exposed blank trigger seat. The rest of the parts include a Struble nickel silver winding check, a small chrome hook keep, a Fuji titanium SiC tip top, and a Fuji rubber butt cap. Most of these components will have to be modified first before being assembled to the rod.

Wednesday, January 6, 2010

All in a day's work

Guided on a cold San Marcos day. To sum it up; the big bass were too wise, the small bass were not, M-Rod and Dennis went for a swim, fished till dark, hot coffee helped, took some good pics, and someone stepped on my micro-lite spinning rod and broke it. Still better than a 9 to 5!

Friday, January 1, 2010

A look back at 2009

2009 started off with a mid January trip to the Lower Laguna Madre. Our good friend Captain Kenny Smith took Johnny Quiroz and I out on his flats boat. Kenny has some of the images of this trip on his blog. Given that the tide fell lower than usual we did pretty well with redfish and trout. I do recall breaking a spinning rod on that trip. It's been rebuilt since then.
Brady and I went to the Medina three times this year. We first went in February hoping to get into some hybrid striped bass. Little did I know that I would have my best day with this species in September and not February. The Medina is always nice to visit. As a rule of thumb I will only start going when it starts getting green, and that's about late March.

This trip off Port Aransas with Captain Eric Lucas was a great experience and I got some excellent photos. This year I really broke into taking moe photos than casts. It is more challenging than you may think. As for fishing, now that I've got my zodiac I can take more short runs into the Gulf of Mexico and just outside the surf. Still cannot figure out how I landed only one small tarpon this year. Will do better next time.

Palacios, part 1. I told myself I would not go back after the first trip here, but I did. It was a good experience but I need to introduce Dustin to some of my better redfish spots. Dusting bought his first fly rod and reel this year and he is comitted to learning it better. Ironically I am the one always pumping up fly fishing and I did as much spin fishing this year. OK. maybe I'll go back to Palacios one more time.
Other fishing expeditions (also pre-blog) that deserve honorable mention:
February 22, San Marcos River with Brady, cold day,
March 4, Port Aransas with Bobby and Lance, found reds the 2nd day,
May 22, Port Aransas with Brady, Ladyfish under lights and Redfish in high water,
May 29, Laguna Vista Cove by kayak, good day for redfish and snook,
June 13, Lockhart, Texas private bass lake with HG Lehman,
July 3, The Red River out of Lake Texoma for stripped bass,
July 10, San Marcos River with William T. Bass and sunfish,
August 11, Lake Austin with my girls on the zodiac,
August 15, Canyon Lake with Chip Evans' family, catfish on ultra-lite spin,
and countless other outings to our home waters, the San Marcos, Canyon lake and Lake Austin.

Tuesday, December 29, 2009

"Those waves look pretty big!"


Well, what can I tell you about another well planned outing gone bad? Impatience is not a virtue but a mortal sin. Dustin and I committed to going once he scheduled this particular day off of work. Destination: Padre Island National Seashore. We took Dustin’s 4x4 Toyota and packed my zodiac in the back. Like I do in my Nissan, we strapped my 9.8 Tohatsu motor to the back of the passenger front seat. About three hours into the trip we hit the sand. The bumps didn’t seem any different than on any other beach I had driven on. The morning light hit us about 15 miles down the beach. We could clearly see that the surf was a torent and the water like chocolate milk. Not even a line wet and we were thinking about plan B, drive the whole 60 mile of beach to Port Mansfield. So, we did. A thousand rough spots and 21 deer sightings later we were at the scene of my first fall 2009 weather beaten trip. Once again Port Mansfield was not about to just hand over the fish. Dustin and I fished the surf and off the jetties first. I prepared to air up the zodiac when I discovered that the high pressure pump had broken in the back of the truck. Not only that but beer bottles in my cooler broke and soaked my sandwiches. Double whammy! We inflated the zodiac to the max pressure we could get it without the HPP. It floated and plowed but could not get on plane without being rigid. We fished a few near spots with the dinghy and turned up nothing with artificial. Only dead shrimp that Dustin brought prevented total skunkitude by landing us some hardhead cats. These were not ideal fish to land on a zodiac. It was like giving a cat with sharp claws a balloon to play with and it would be just a matter of time before we had an accident. So, we gave up on that and called it. Why is it that I write more about failed missions than I do successful ones? Texas winters: sometimes good and other times not so good.